Tuesday, May 25, 2010

How to create a column based report

Like with my previous post about rotating text on a report (find out here how to place text vertically on a report), there are several ways on how to accomplish this. And what is it that we are trying to accomplish? A report with a true column setup. So first column 1 is filled, top to bottom, then column 2. And then over to the next page.

So like this:

And not like this:

For this, we need 2 some lesser used report methods, gotoYmm100 and mm100Left. More about these later.

Like earlier, we use an inventory report, with InventTable as our datasource, for demonstration purposes.

Create your basic report settings (add the datasource and setup some ranges, create a report design and add some fields in the body section). Now for the extras we need:

public class ReportRun extends ObjectRun
{
int curcolumn;

int mytopofpage;
int mybottomofpage;
}


We need a variable that holds the current column position.
And 2 variables, indicating the top and bottom of the page.

For the init method of our report:

public void init()
{ ;
super();

mytopofpage=423;
mybottomofpage=1000;

curcolumn=2;
element.ChangeColumn();
}


We need a method to change columns, switching between column 1 and 2.
We call this method in the init method of the report, to make sure we start printing on each page at the same, correct top position.

void ChangeColumn()
{
if(curcolumn==1)
{
curcolumn=2;
element.gotoYmm100(mytopofpage);
InventTable_Body.leftMargin(100,Units::mm);
return;
} else if (curcolumn==2)
{
curcolumn=1;
element.newPage();
element.gotoYmm100(mytopofpage);
InventTable_Body.leftMargin(20,Units::mm);
return;
}
}

In the switching columns method, we shift from one column to the other.
In case we go to column 2, we reset our cursor print position back to the top of the page. For this, we use the gotoYmm100 method. This method allows us to set the vertical position where the next report section is printed.
Then we change the left margin of our section, in order for it to appear on the right side of the page.
When we go to column 1, we set the newPage command in order to start a new page in our report. After that, we set the print position with gotoYmm100 as well, to make sure we start on the same level for both column 1 and 2. Also the left margin is reset to the left.

One thing left, the body of our report, with the executesection.

public void executeSection()
{ ;
if(element.mm100Left() < mybottomofpage) element.ChangeColumn(); super(); }


In this part, we check where we are now with our cursor on the page. If we are near the end, we need to switch columns. We use the mm100Left method, but there is also currentYmm100.

Our result will look like this:


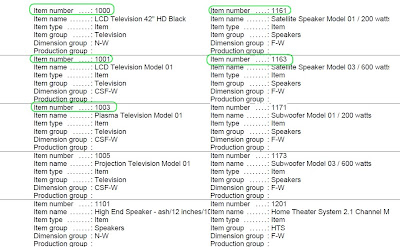
So item numbers counting up in column one, then column two.

Now if you look at your print preview in Ax, the output may look garbled. And if you use the built-in PDF generator, dito. But if you print the report to printer or use a third party PDF generator, all looks OK.

Monday, May 24, 2010

How to place text vertically (rotated) on your report

With a standard Ax installation and with the standard available report control properties, it's not possible to place text vertically (rotated 90 degrees) on a report. (or am I wrong? Let me know in the comments! I'll rename this post to 'An alternative methode to place text vertically on a report' ...)

Now you can have an add-on for Ax that does this for you. Or you may use a separate report generator all together. Or you can use the following solution, using tools available in standard Ax, but with some help of Microsoft technology.

What we gonna do is create a graphics object in memory, write some text, rotate it and then use it as a source for an image control in Ax. Sounds complicated? Maybe. But it's really not that difficult.

Let's assume you have a report in Ax, based on table InventTable. Your report is showing some item information, and we want the itemid as barcode on it as well.

I've put all the code together in one display method. Not best practice, but easier for me now.
Here goes:

Display container ShowBarcode()
{
System.Drawing.Bitmap   BarcodeBitmap;
System.Drawing.Graphics BarcodeGraphics;

int     dx=200;
int     dy=200;

str     barcodetxt;
Image   BarcodeImage;

System.Drawing.Pen                TxtPen;
System.Drawing.Brush              TxtBrush;

System.Drawing.Brush              DrawBrush;

System.Drawing.StringFormat       StringFormat;
System.Drawing.StringAlignment    StringAlignment;

System.Drawing.Font BarcodeFont = new System.Drawing.Font('BC C128 Narrow',36,System.Drawing.FontStyle::Regular);

Int64             BarcodeBitmapPtr;
BarcodeCode128    MyBarcode = BarcodeCode128::construct();
;

BarcodeImage = new Image();

BarcodeBitmap = new System.Drawing.Bitmap(dx,dy);
BarcodeGraphics = System.Drawing.Graphics::FromImage(BarcodeBitmap);

barcodetxt=InventTable.ItemId;
MyBarCode.string(true,barcodetxt);
MyBarCode.encode();
barcodetxt=MyBarCode.barcodeStr();

// clear canvas
DrawBrush = System.Drawing.Brushes::get_White();
BarcodeGraphics.FillRectangle(DrawBrush,0,0,any2int(dx),any2int(dy));

// set barcode text
TxtBrush = System.Drawing.Brushes::get_Black();
TxtPen = new System.Drawing.Pen(TxtBrush);

// set text alignment
StringFormat = new System.Drawing.StringFormat();
StringAlignment = System.Drawing.StringAlignment::Center;
StringFormat.set_Alignment(StringAlignment);
StringFormat.set_LineAlignment(StringAlignment);

// init rotation
BarcodeGraphics.TranslateTransform(any2int(dx),0);
BarcodeGraphics.RotateTransform(90);

// draw text
BarcodeGraphics.DrawString(barcodetxt, BarcodeFont,TxtBrush, any2int(dx/2) , any2int(dy/2),StringFormat);

// transfer image to Ax
BarcodeBitmapPtr=BarcodeBitmap.GetHbitmap();
BarcodeImage.importBitmap(BarcodeBitmapPtr);

return BarcodeImage.getData();
}

Now make sure you have a report control, type bitmap. Set the newly created display method in the properties.


Tip: Watch out with the ResizeBitmap property. When an incorrect image ratio is used, they will reduce the readibility by scanners.
If we run our report, the result will look like this (based on demo data company):

If we would put the text in plain font, we would get something like this:
(leaving out the barcode encoding and using font Arial)

Like I said: If you know a better/easier way to rotate some text in reports, let me know in the comments!

Sunday, May 16, 2010

Bill Gates invests in cloud technology

If you are following the active dicsussion wether cloud technology will see its breakthrough in 2010, you will be interested to know that Microsoft founder Bill Gates is also investing in cloud technology. Only with a different twist.
The former chairman of Microsoft is funding research in order to actually create clouds up in the air, made up of sea water. The goal is to cool our planet, also known as geoengineering. You can read more about it over here.

Saturday, May 15, 2010

How to use barcodes in your Ax report - Part 2/2

In part 2 of the barcode posts (read part 1 here), we'll have a look at another barcode type.
We gonna see how to use barcodes of type Code 128 in your report. This is a high density barcode type, with checksum digit, supporting alphanumeric symbols. Very commonly used.

We gonna use the same example as in the previous post, an inventory report, with InventTable as the datasource.

We'll start off with our class declaration.
In this, we'll create an object for class BarcodeCode128. This class is used for encoding the barcode, checking/calculating check digit.

public class ReportRun extends ObjectRun
{
   BarcodeCode128 MyBarcode;
}
In the init method of our report, we instantiate the class.

public void init()
{  ;
   MyBarcode= BarcodeCode128::construct();

   super();
}

As opposed to Code 39 (see previous post), we now have to do some actual encoding. But no worries, the barcode class does this for us.
We'll create our display method in which we'll do the encoding:

Display BarcodeStr ShowBarcode()
{
   MyBarCode.string(true,InventTable.ItemId);
   MyBarCode.encode();

   return MyBarCode.barcodeStr();
}
Remember to set the report control properties with the appropriate font, something like this:


And this is what your result looks like when you call the report.


As you can see from the other classes in the AOT named Barcode*, Ax supports barcodes of type EAN, Interleaved 2 of 5, UPC, ...

Tip: This website, a site by Russ Adams, has some real good info on barcodes.

Friday, May 14, 2010

How to use barcodes in your Ax report - Part 1/2

Barcodes have been around for a long time. And despite newer technologies, they remain popular. Deservedly!
You can use barcodes in production environments, for coding your invoices, in retail, POS, ...

The programmers of Ax have made it easy for you to use them. Fonts and classes have been provided in Ax to get you up and running with barcodes quickly. In this post I'll show you how you can use barcodes in your report.


This is post 1 of 2. In this post, we'll cover the very basics. And for that, we'll use barcodes of type Code 39. Why Code 39? Because they are commonly used, read by almost every scanner and very easy to implement.

Code 39 supports alphanumeric characters, and some special characters like - . $ / + % SPACE.
Unlike with most other type of barcodes, no real encoding is needed (no check digit either). All you really have to do is set the right font. This means you can even use this barcode type easily in for example Word!
Altough Ax supports encoding of Code 39, we are not going to use it now, for reasons of simplicity. (Encoding will be dealt with in part 2 of this post.)

Let's assume we have a report in Ax, showing all our inventory items. This reports uses InventTable as a base.
We would like the barcode to consist of the ItemId. For that purpose, we create a display method, like this:

Display str ShowBarcode()
{
return "*"+strupr(InventTable.ItemId)+"*";
}

The asterisk (*) is the start and stop character in Code 39, that's why we add it.
We add this display method to the body of our report.
Next up, we set the appropriate font for our report control.


Make sure you set the width of the report control big enough! (Make it center aligned as well.)

And that's all there is to it. Have a look at the result, as seen in our print preview:

Note that the readible text below the barcode is printed with a separate report control. It's not included with the actual barcode.


Comment:
The main drawback with Code 39 is the length of the barcode. They use up quit some space on your reports, where as the available space may be limited on some occasions (small labels).

Look out for part 2 of this post, with encoding of Code 128, a more dense code.

How to let the user browse for a folder

When it comes to programming in Ax, I have to confess I'm lazy.
I reuse existing code as much as possible. I will store portions of code in static methods in a global class, so I can reuse them as the need arises.
Basically, I don't believe in re-inventing the wheel. When something has been done and it has been done good, why try duplicating it?

That's why I would like to draw your attention to some lesser known code in Ax, the browseforFolderDialog method from the WinAPI class. It's easy, flexible and powerful. (That's what I look for in good quality code.)
The code will provide the user the opportunity to supply a folder name from the file system, a common request in software.

Format:

client public static str browseForFolderDialog(
[str _description,
str _selectedPath,
boolean _showNewFolderButton])

So you can give a description to your dialog. Set a default path. And give the user the possibility to create a new folder.

Example:

str filelocation;
;
filelocation=WinApi::browseForFolderDialog('Your_Description_here',@'C:\Temp',true);


Of course, you can validate the user input (did the user press cancel?) with

WinApi::folderExists(filelocation);

This one line of code sure beats writing your custom dialog or a complete form with the necessary controls.

How to retrieve the location of various Ax and Windows folders

Axapta

For retrieving Ax client folder information, we can use the xInfo class, with the directory method.
Here are some examples.


The bin directory of the Ax client
xInfo::directory(DirectoryType::Bin);

Result:
C:\DynamicsAx\Ax2009\Server\Standard32bit\Client\Bin\


The Axapta client temporary folder
xInfo::directory(DirectoryType::Temp)
Result:
C:\DynamicsAx\Ax2009\Server\Standard32bit\Client\appl\standard\tmp\


The include folder of the share directory
xInfo::directory(DirectoryType::Include);

Result:
C:\DynamicsAx\Ax2009\Server\Standard32bit\Client\share\include\


A different one, the application log directory

xInfo::AOTLogDirectory();
Result:
C:\Users\Public\Microsoft\Dynamics Ax\Log\


Windows

But there is more. Sometimes, you might have a need for a temporary file. Your Windows client can help you with this.
How to get the location of the Windows temporary folder (a personal, user specific folder, located in your profile)

WinApi::getTempPath()

Or if you like shortcuts: System.IO.Path::GetTempPath()

Outcome:

C:\Users\administrator.HQ\AppData\Local\Temp\7\

And you can get a temporary file name as well, so no need to create a routine that generates a random id:

WinApi::getTempFilename(WinApi::getTempPath(),'Ax')
(you only need to supply the folder name, and some prefix)
This will give you something like this

C:\Users\administrator.HQ\AppData\Local\Temp\7\Ax1518.tmp

Not enough folder information for you? No problem. You can retrieve all your Windows folder information with the WinApi::getFolderPath method. All you need to do is to supply the right parameter, coming from the WinAPI macro.

What about the temporary folder of Internet Explorer:

#WinAPI

WinAPI::getFolderPath(#CSIDL_INTERNET_CACHE);

The desktop of the current user:

#WinAPI

WinAPI::getFolderPath(CSIDL_DESKTOPDIRECTORY);


Other macro names you can use as a parameter: CSIDL_FAVORITES (favorites), CSIDL_WINDOWS (Windows directory, alternative for WinApi::getWindowsDirectory()), CSIDL_FONTS (fonts directory of Windows), ...